As promised in a previous Blog post, here is my guide for installing OSX Lion on a Gigabyte GA-Z68MA-D2H-B3 based system.
First off, before you can even think about following this guide there are a few pre-requisites.
1. You’re going to need to have another working intel Mac or Hackintosh system that is capable of running OSX Snow Leopard so you can purchase Lion from the Mac App Store
2. or, you will need a working intel mac and a retail OSX Lion USB thumb drive from apple LINK
You may wonder, why do I need another working system, well this is because you’re going to need to be able to create a working bootable usb installer for your hackintosh system.
read up on what you will need to do after you’ve obtained your legal copy of OSX Lion over on the TonyMacx86 website at this LINK
OK, now that you’ve used unibeast to make your bootable usb OSX Lion we can work on getting your GA-Z68MA-D2H-B3 Hackintosh up and running.
Things that you will need to know and files you will need.
1. you need to figure out which version Bios your GA-Z68MA-D2H-B3 motherboard has. with this info in hand go to this LINK and download the matching version DSDT file and keep it handy you will need it later on. (Note: if your motherboard’s bios version is newer than the newest version DSDT file you may need to downgrade your bios to a earlier firmware version so you can get a match)
The reason you want to do this is this will help you to get a better functioning hackintosh that is able to sleep, and shutdown and reboot without causing bios resets or other issues.
Hardware Bios settings that will help your hackintosh work correctly.
- Load Optimized Defaults
- Advanced Bios Features :
- First Boot Device : USB HDD
- Second Boot Device : Hard Disk
- Init Display First : PCIE x16
- Integrated Periphericals : AHCI
- Power Management Mode : HPET 64 Bits+Power On by Mouse+Power On by Keyboard
Recommended Hardware for your GA-Z68MA-D2H-B3
My recommendation is to visit TonyMacx86’s site and use their guide to help you figure out what hardware you want to use to build your hackintosh system.
Here is the LINK
I wanted to stay under 250 US Dollars for my build so here is what I went with.
- GA-Z68MA-D2H-B3 Motherboard
- Intel® Pentium® Processor G620
(3M Cache, 2.60 GHz) - 16 GB of Patriot DDR3 PC10666 Ram
The rest of my components were recycled from my old D945GCLF Atom Hackintosh Build.
- Cooler Master CM360 Micro-ATX Case
- Apevia Java 500-Watt Power Supply
- 120GB Seagate SATA HD
- HP LightScribe DVD +/- DVD Burner
I also used a PNY XLR8 GTS 250 1GB PCI Express video card that I had left over from a upgrade to my Gaming PC instead of using the onboard video, as I’ve had good success in the past with Nvidia Video cards in other hackintosh systems.
Last but not least, while it is possible to use a PS/2 keyboard or a PS/2 Mouse (as this motherboard only has one PS/2 connector), You should stick with a USB keyboard and mouse at least up until after you’ve gotten Lion installed and have booted to the OSX Lion Desktop for the first time, as Lion will not complete the first time setup without a USB keyboard attached (possibly won’t complete it without a USB Mouse attached either, but I didn’t test this)
OK on to the installation guide.
connect the bootable USB Thumb Drive that you prepared using the unibeast installer following the directions on the TonyMacX86 website from the link I provided earlier.
go through the installation process, when the installer is finished restart your hackintosh and leave the usb key connected, on the selection screen choose your hard drive instead of the USB Lion installer and boot the system,
go to TonyMac’s site and download multibeast from here
Before you run Multibeast copy the DSDT file that I had you go download to the OSX desktop
Then Run Multibeast and select the following settings
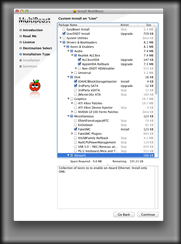
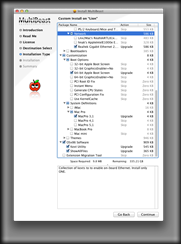
After finishing up the multibeast installation, you should now be able to eject the USB flash drive you used to install Lion, and then reboot your Hackintosh and get it to boot into OSX.
Please note:
You will need to re-run the multibeast installer and re-install the AppleHDA Rollback kext file every time you install a OSX system update, as the OSX update will replace the AppleHDA file with the correct unmodified version of the Kext and will cause your sound to stop working until you reinstall the AppleHDA Rollback Kext.
If this is a major pain you should be able to find a cmedia chipset USB Sound card on Ebay that is natively supported in OSX Lion that you can use instead of the onboard sound.
Also I currently do not own any USB 3.0 Devices but I did install the USB 3.0 NEC / Renesas selection and didn’t have any problems with it. When I look under System Information it does show the USB 3.0 Hub on my motherboard as a ultra speed hub, so it may work. Again, I don’t own any USB 3.0 devices yet so I can’t guarantee this will work, or that it won’t cause problems if you try it and then plug in a USB 3.0 device. If you want to test it and report back I will allow the comment to show up with your results if you want to reply to this post.
I remain your obedient servant,
Doctor Evil 30564


